


How to Start Your Planner
So, you have a new planner and you're super overwhelmed. Living in fear of making that first pen mark, that you'll ruin the perfect paper specimen in front of you. Listen, I get it. Even I live in fear of my new planner and I designed the dang things.
Here are a few tips and tricks on How to Move Into Your New Planner:
(Friendly note: if a website filled with text makes you want to go and rock in a corner, check out our How to Move Into Your New Planner and How Laurel Actually Uses her Planner YouTube videos.)
First, remember that in your first planner session, your goal is to fill in your big picture things for each month (birthdays, anniversaries, etc) and the only month you need to fill in with details is the upcoming month. Keeping this in mind helps keep the scaries and the overwhelms away.
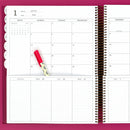
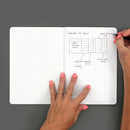
1. Decide on your color coding system (and if you're going to use one). I find color coding helpful. I usually write everything in my erasable black pen and use my erasable highlighters over the text to color code each thing I write in my monthly view.
2. Fill in birthdays, anniversaries, important dates, don't forgets into your planner. I put these into my monthly view. If I need to buy a card or send a gift, I put that task into my weekly or daily to-do list section.
Now it's time to move into your upcoming month which is maybe the part where the most panic comes.
Remember a few things as you start upon this great journey, dear traveler. A sort of Fight the Planer Perfection Manifesto, if you will.
- Your planning methods can and should adjust depending on what you life looks like each month;
- You can and should become an even better planner as the year goes on so don't expect month one to be perfect;
- Don't give up if your monthly spread doesn't look like the ones you see on the internet (mine certainly don't and I show my planner spreads on the actual internet);
- Planners are supposed to work for you (not the other way around), so adjust and pivot and keep on trucking!
Okay, here we go:
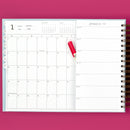
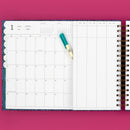
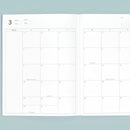
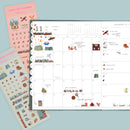
1. First, I put deadlines and big events into the monthly view. Some months I put a lot more details into the monthly view than others. Just depends on where my headspace is and how busy things are. I color code on the monthly view because it makes my brain feel calmer. (I use the Vertical Weekly Planner, but the Project Planner really is a close tie for my favorite planner.)
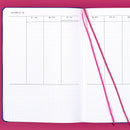
2. On the short/weekly pages, I insert all of my appointments and deadlines into my days (even if those are already on the monthly view). If I need to print out papers for an appointment or call to confirm, I assign those tasks a day and write them in my to-do section.
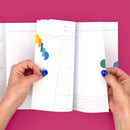
3. I love the visual gift that is time blocking. It helps my brain to see the space as taken and as empty, so next I use my beloved erasable highlighters and dig in for a small coloring session. I usually just time block the first few weeks since, well, I can't remember the last time I had a week really looking like I planned it to look. (for details on how this process actually looks, watch this YouTube video.)
4. Next, I move backwards from my deadlines in both my monthly view and my weekly/short pages and I break down the tasks that need to get done and assign them a day. For instance: If I have a product launch on November 30th, I will break down the tasks leading up to that launch (product photography, creating product listings, email design, finalizing product, shooting video content, etc) and I will assign those tasks a day (or a week) to get done on my weekly/short pages. I will usually write that into the "to do today" section if they need to be done by a specific day or I will write those tasks into the "to do this week" column. Pro tip: It's a good idea to have a brain dump notebook or journal (or scrap of paper) to just brain dump ALL of the tasks associated with each deadline. Use that brain dump to select formal tasks and put those into your planner.
5. Each week on Sunday, I spend an hour or so planning meals for the week ahead. I also use this time to really make sure that I have things lined up for the week ahead. I review my upcoming appointments, put some specific to-do items in, and move things around if it turns out I don't have time to get the things my "before the month started" brain thought I'd have time to do.
6. During the day, every single day, I am adding items to my planner, moving things around, and crossing off items on my lists.
7. The night before, I usually glance once more at what's coming up the next day. This helps minimize my 3am panic wake up time.
Here's the deal friends: YOU CAN DO THIS. The Laurel Denise Planner System helped me manage a full time staff of 5 while being a stay at home mom to our 2 little kiddos. Is focus my number one strength on the Clifton Strengths test? Yes, yes it is. But, also, I live and die by my lists. And I do that not because I'm uptight (okay, maybe a little) or tightly wound (okay, just a tad), but because I love the feeling I get from seeing an idea or a plan come to fruition. I love the feeling in my brain when I know all of the tasks flying around up there have a home and a place to safely land.
Some pro tips now that you are going to be a Planner Queen:
1. I usually only put the timing of things on my weekly short pages and the larger concept of the event or deadline on the monthly page. (For instance: on the monthly view, I would put "soccer" or "work" on Saturday, but I'd put the details of the timing of that onto my short, weekly pages)
2. If I am really stressed and it's a really busy month I will literally write the same task in a million different places. There are no rules. I get to do what works for me. So, sometimes, the thing written on my monthly view also gets written on my weekly/short pages.
3. Use erasable pens and highlighters. But don't leave your planner in the heat because heat erases those erasable pens and highlighters and then you have to put your planner into the freezer to get the writing back and it's just weird.

